GUIDES
Setting up your OurInfinite.com email with your personal Gmail account
Please have your OurInfinite.com email address and password handy, you will be entering these information in this guide.
IMPORTANT: Using Gmail to primarily check your OurInfinite.com could delay messages received in your Gmail Inbox.
*To force mail check, go to the Troubleshooting section found in this page or click here.
**To skip to setting up Sending (Outgoing) mail as OurInfinite.com, please click here.
***To skip to Troubleshooting, please Scroll to Troubleshooting section, please click here.
Recommended Mail Client Secure Settings
Username: FirstnameLastname@ourinfinite.com
Password: Use the email account’s password.
Incoming Server: ourinfinite.com
IMAP Port: 993
POP3 Port: 995
Outgoing Server: ourinfinite.com
SMTP TLS Port: 587
SMTP SSL Port (use if TLS port is not available): 465
Note: IMAP, POP3, and SMTP require authentication.
Retrieving (Incoming) mail from OurInfinite.com:
1. Sign in to your personal Gmail account (click to open a new tab). Note: Any Gmail account can be used.
2. Click on the Gear icon near the top right corner, then click on Settings.
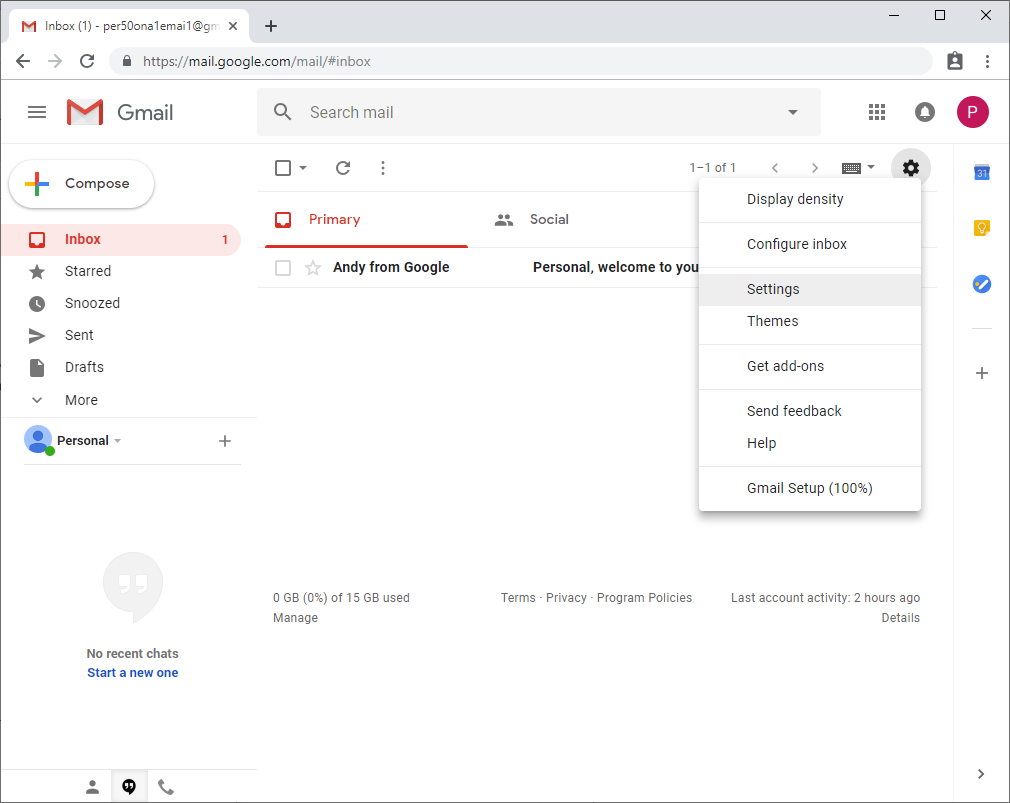
1. Sign in to your personal Gmail account (click to open a new tab). Note: Any Gmail account can be used.
2. Click on the Gear icon near the top right corner, then click on Settings.

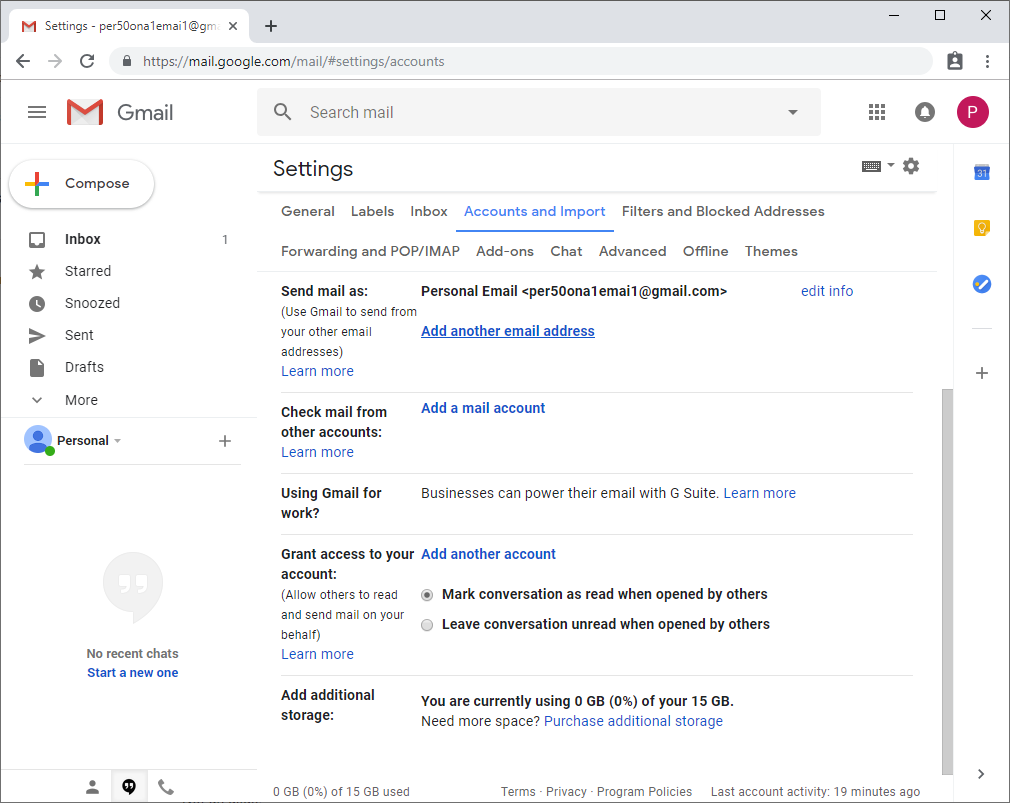
3. At Gmail Settings, click on the Accounts and Import tab, then under Check mail from other accounts click on Add a mail account
(a window will pop-up).
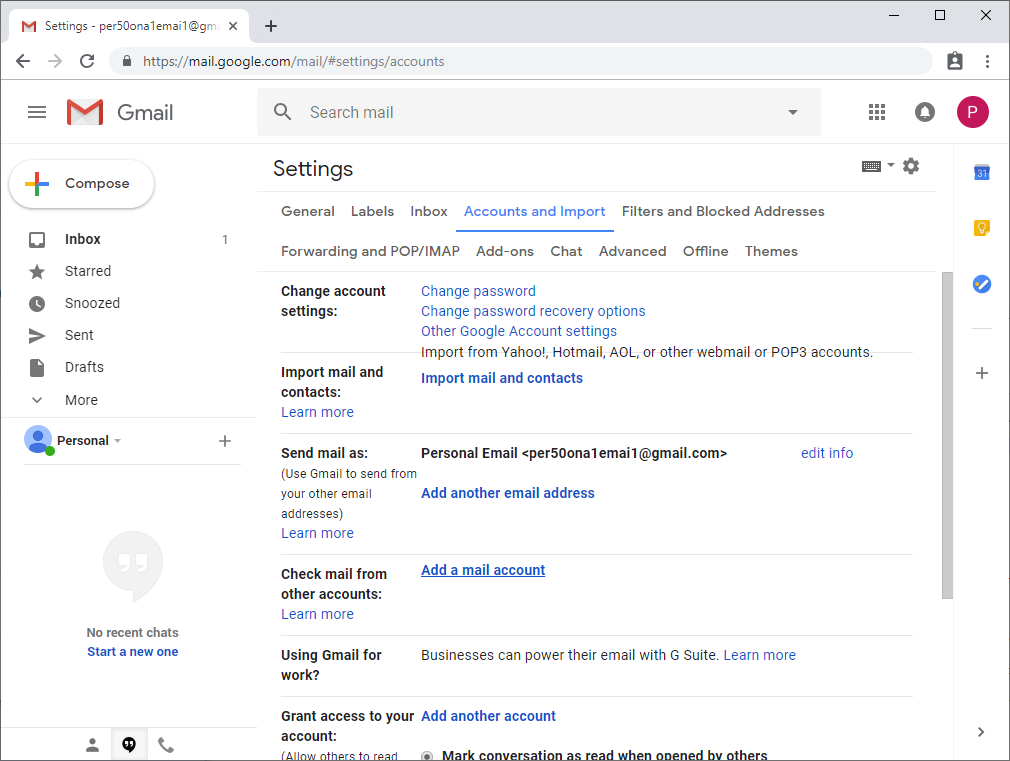
(a window will pop-up).

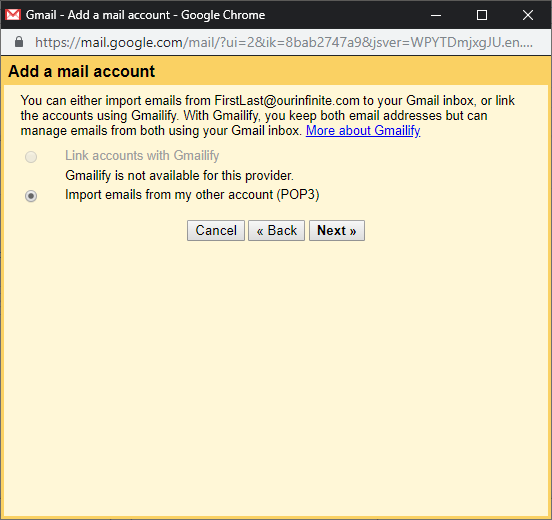
4. At the Add a mail account window, enter your OurInfinite.com email address, then click Next. (For example: FirstLast@ourinfinite.com)
Note: Email addresses are not case sensitive.
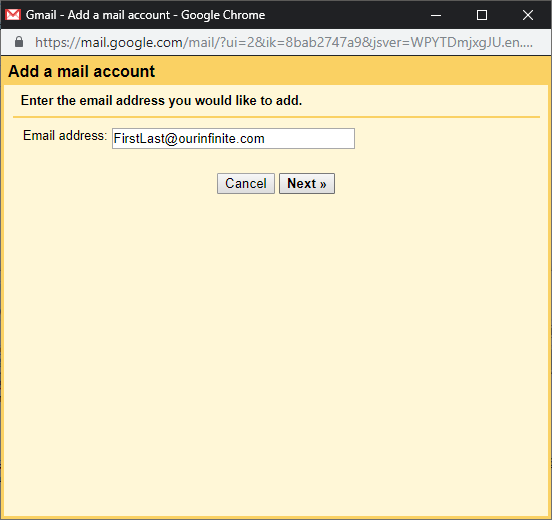
Note: Email addresses are not case sensitive.

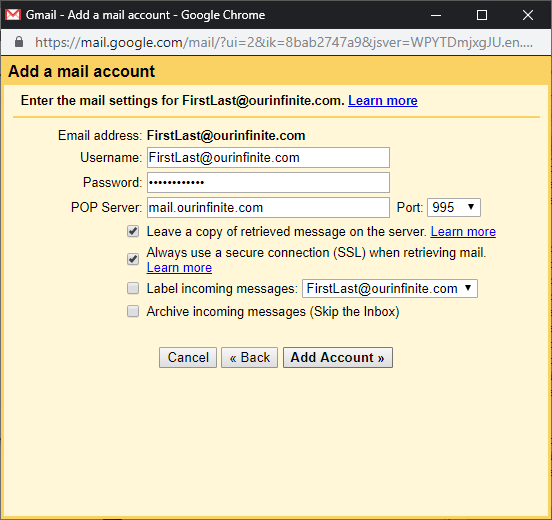
6. On the next page:
a) Enter your Username (For example: FirstLast@ourinfinite.com)
b) Enter your Password (your email account password for OurInfinite.com)
c) Verify the POP Server: ourinfinite.com
d) Change the Port to: 995 (if not already selected)
e) Check Leave a copy of retrieved message on the server. (so you could also use the online WebMail application: https://webmail.ourinfinite.com
f) Check Always use a secure connection (SSL) when retrieving mail.
g) Leave unchecked Label incoming messages...
h) Leave unchecked Archive incoming messages
i) Please double check settings, then click on Add Account

7. You should see a Your mail account has been added.
NOTE: If you have not setup Sending mail choose Yes, I want to be able to send mail as FirstLast@ourinfinite.com to continue click Next, then skip to step #4 of the next section (Sending (Outgoing) mail as OurInfinite.com)
*If you have any issues, please verify the previous step (step #6) and re-enter your password carefully. Also please try the troubleshooting found below before contacting Tech Team (tech@ourinfinite.com) for support.
Sending (Outgoing) mail as OurInfinite.com:
NOTE: Skip to step #4 if you're continuing from step #7 of Receiving mail setup.
1. Sign in to your personal Gmail account (click to open a new tab). Note: Any Gmail account can be used.
2. Click on the Gear Icon near the top right corner, then click on Settings.

2. Click on the Gear Icon near the top right corner, then click on Settings.

4. a) Enter your Full Name (What you want to show your client the full name for this email account)
b) Enter Email Address: FirstLast@ourinfinite.com (if not already entered)
c) Check Treat as an alias. (if not already checked), then click Next Step.
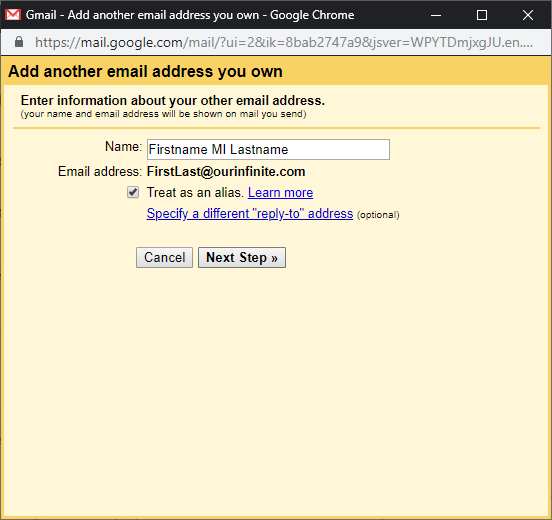
b) Enter Email Address: FirstLast@ourinfinite.com (if not already entered)
c) Check Treat as an alias. (if not already checked), then click Next Step.

5. a) Enter SMTP Server: ourinfinite.com
b) Change the Port to: 587 (if not already selected)
c) Enter your Username (FirstLast@ourinfinite.com)
d) Use Secured connection using TLS (recommended)
e) Click on Add Account
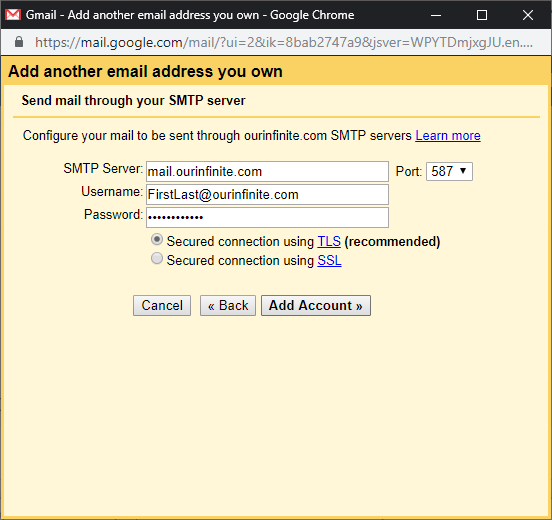
b) Change the Port to: 587 (if not already selected)
c) Enter your Username (FirstLast@ourinfinite.com)
d) Use Secured connection using TLS (recommended)
e) Click on Add Account

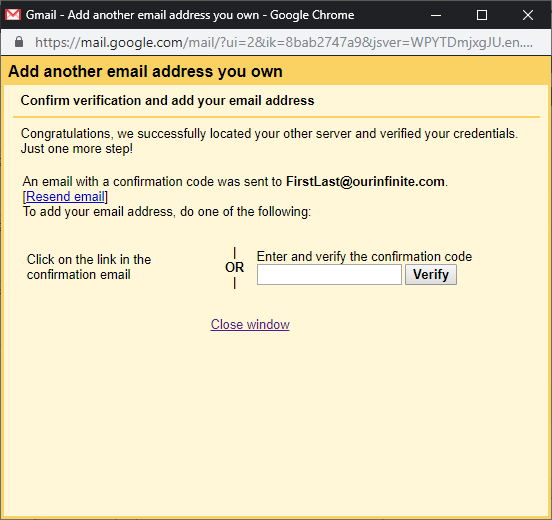
6. You will be directed to a Confirm verification page. Please close the window to verify receiving mail.

7. Go back to your personal Gmail account Inbox, then open the message from Gmail Team.
*If you have not received the message, just keep refreshing your Inbox (it may take a few minutes).
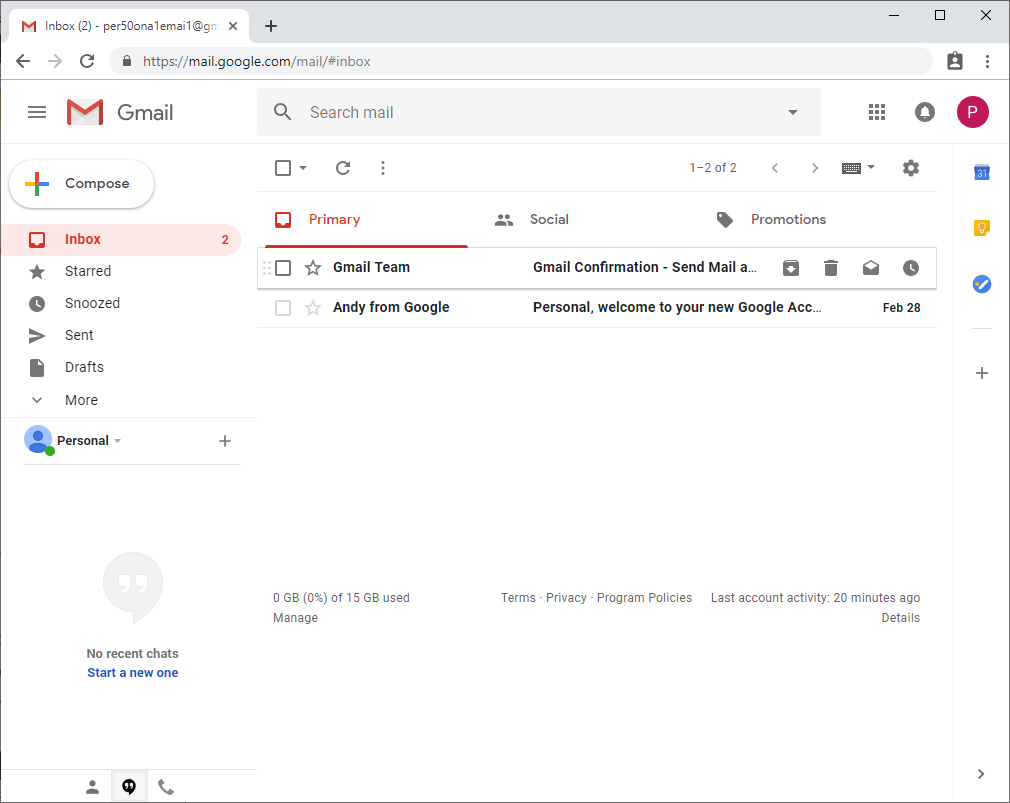
*If you have not received the message, just keep refreshing your Inbox (it may take a few minutes).

8. You may click on the link (as shown) to confirm the request then on the next page, click confirm.
You should now see a Confirmation Success!
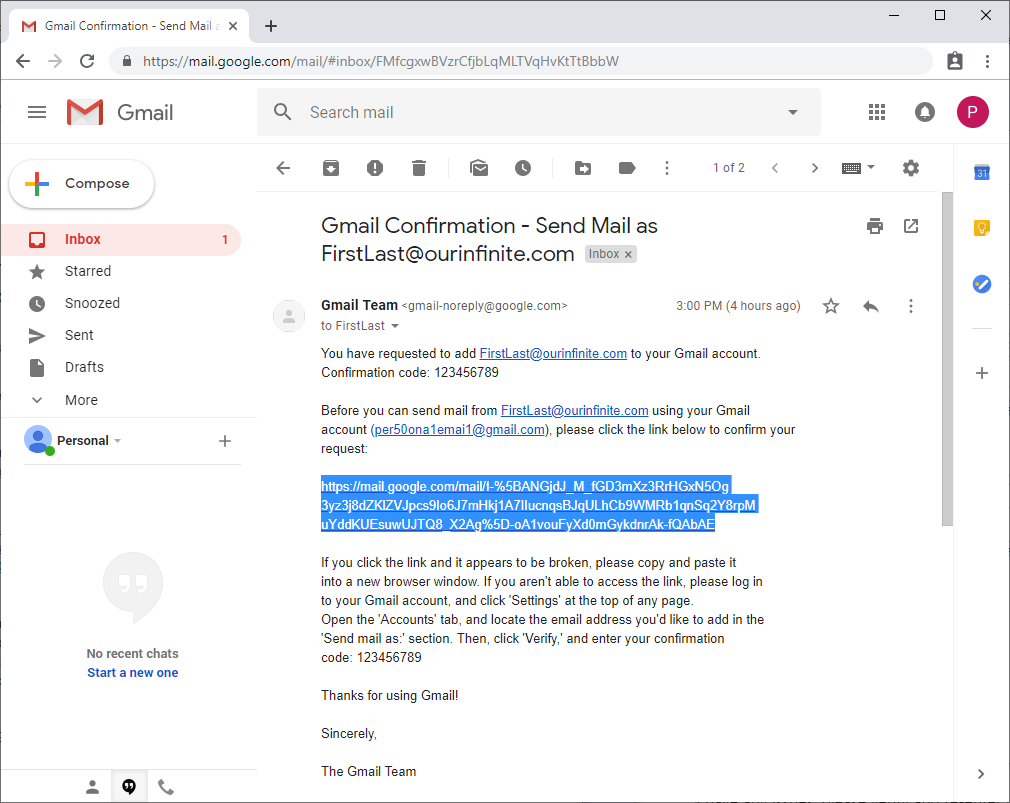
You should now see a Confirmation Success!

9. Go back to the Accounts and Import tab in Settings, then click on Reply from the same address the message was sent to (so when you reply to a message sent to your OurInfinite.com email, it will automatically reply with the same email address it was sent to).
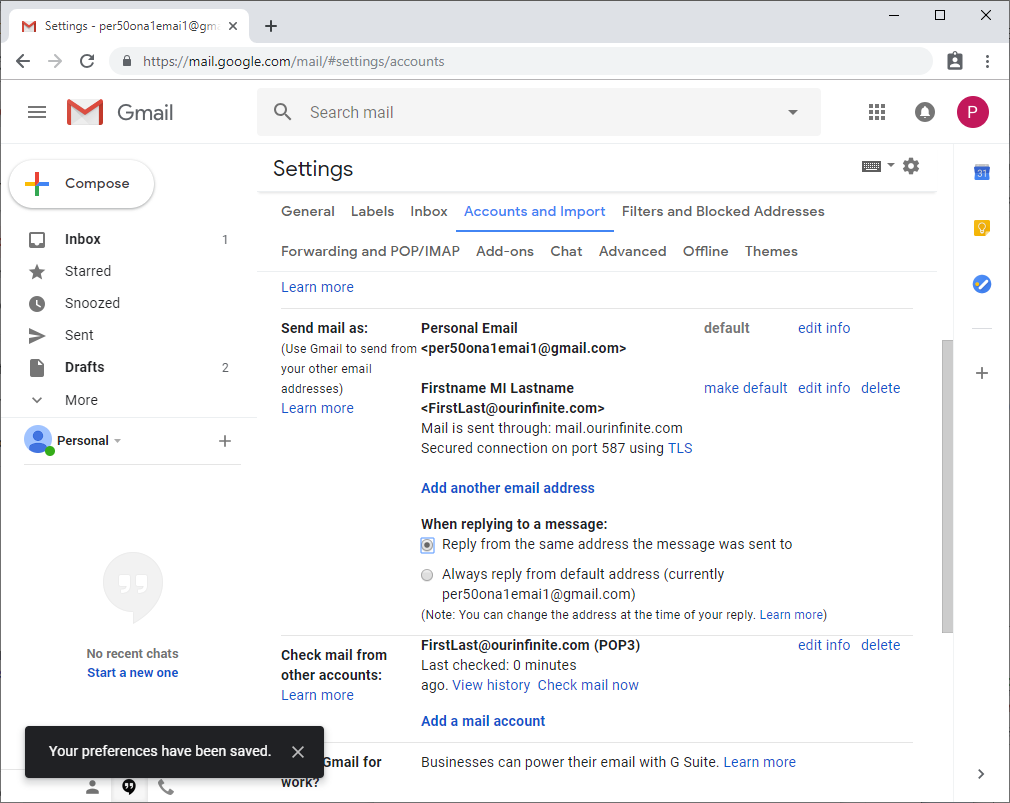

10. To verify if sending mail works, with your Gmail window open please refresh your browser by pressing the F5 key on your keyboard, then press Compose. You should now be able to select the From email address in the New message window.
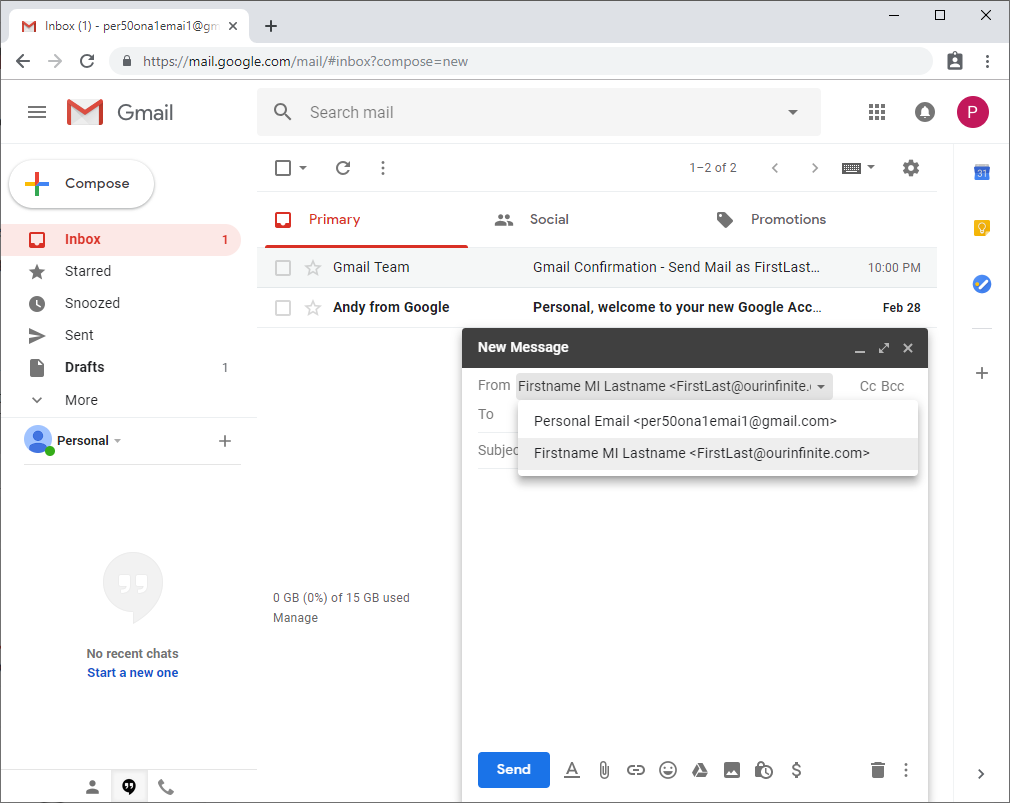

Congratulations! You should now be able to send and receive messages with your OurInfinite.com email account through your personal Gmail account.
*If you have any issues, please verify and re-enter your password carefully. Also please try the troubleshooting found below before contacting Tech Team (tech@ourinfinite.com) for support.
*If you have any issues, please verify and re-enter your password carefully. Also please try the troubleshooting found below before contacting Tech Team (tech@ourinfinite.com) for support.
Troubleshooting:
• SMTP Server (Outgoing) & POP Server (Incoming) address: ourinfinite.com
• For incoming message issues: please double check the POP Server address, POP Server Port: 995 & make sure Leave a copy of retrieved message on the server & Always use a secure connection (SSL) when retrieving mail are checked. If issue persists, please try to login to the online WebMail application: https://webmail.ourinfinite.com and enter your credentials. If you're unable to login, please contact Tech Team (tech@ourinfinite.com) for additional support.
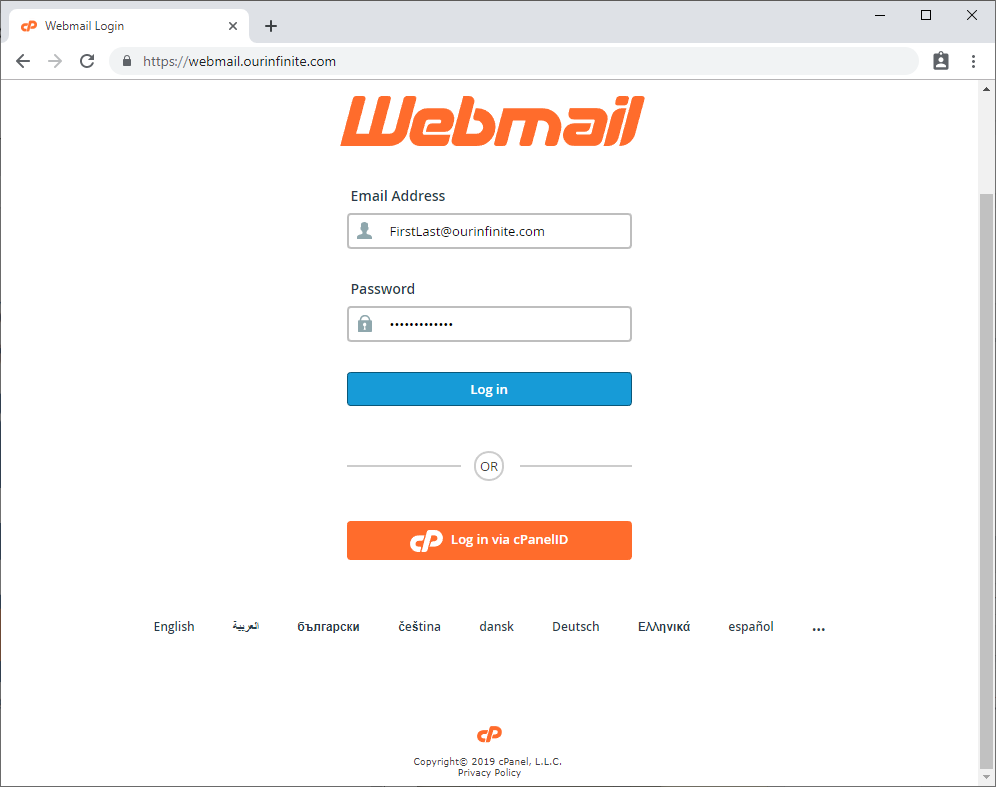

• For outgoing message issues: please check the SMTP Server address, SMTP Server Port: 587 & make sure Secured connection using TLS (recommended) is selected.
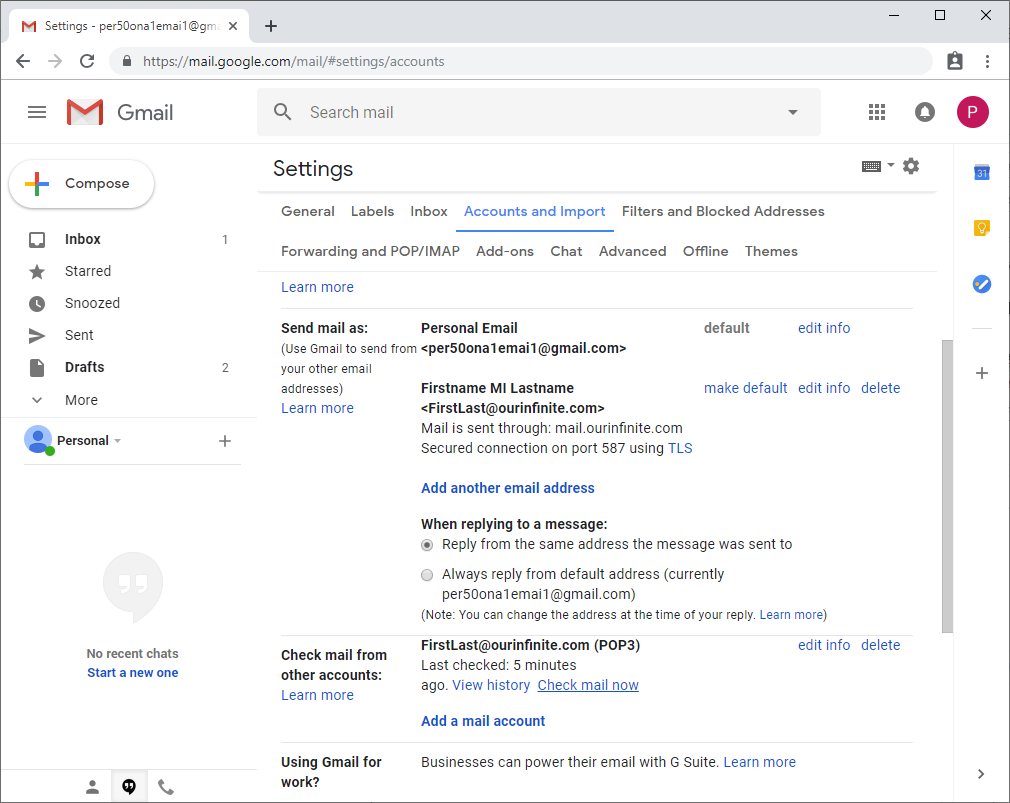
• To check your settings: go to the Accounts and Import tab in Settings, then make sure that there are no errors under Send mail as (Outgoing) & Check mail from other accounts (Incoming). You may click edit info to check or change the settings on both.
• To force mail checking: go to the Accounts and Import tab in Settings, and click on Check mail now.
• If you have an email address alias, please redo Sending (Outgoing) mail as OurInfinite.com and at step #4b, enter your email address alias in the Email address field. Once you have successfully added your email address alias, please delete the initial email address you created by going to the Accounts and Import tab in Settings, under Send mail as and click delete.

For questions, comments or suggestions, please email Tech Team (tech@ourinfinite.com).
Click here to go back to the beginning of the page or click here to go back to Guides page.
